Hallway glow up
- Katie
- Jul 16, 2022
- 10 min read
DIY How To's

Sooooooo…. I’m pretty sure Jeremy, my fiancé, will kill me for starting another project but here we go! It is really attached to a current ongoing kitchen project so I feel like that gives me a free pass, however, I don’t know that he is going to feel that way about it!!
But since I have to repaint my kitchen/hallway anyways with the kitchen project and just regular touch ups that need to be done, plus I need to finally paint the kitchen and hallway ceiling, I feel like this was the perfect opportunity for a little update. In addition, Jeremy is gone for the week, and since patching and painting the ceiling in a main living space is seriously one of the worst projects to do, I feel like this is the absolutely best time to do it!!
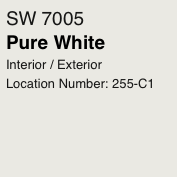
So here we go! Currently, our kitchen, living room, entry, and hallway are all painted a cooler gray. I have gray floors in the kitchen/entry/hallway and currently have a gray island, however, I really am trying to move away from the super gray look. With the upcoming kitchen update, the island will be repainted a navy along with the new cabinets we are adding. So I decided to find basically white, but slightly grayer than white color for the walls…. And also a smidge warmer gray than before. So the color I finally landed on after several purchased samples was Sherwin Williams Fleur de Sel. It is a very very light warm gray. Paired with the SW Pure White, it looks super sharp. And once the added natural color butcher block on the island and new cabinet wall, it will feel so much warmer in my kitchen/main space then it does now.
But anyways, lets get to the hallway (just off of the kitchen and new cabinet wall). Above is the hallway before pictures. So, first off, I fixed all of the wall and ceiling drywall… filled holes, sanded down bumps, etc (I’m pretty sure I never did this last time I painted and it definitely wasn’t done before me). While it is one of my least favorite things to do, prepping for paint is one of the MOST IMPORTANT things you can do before painting spaces in your house!!!

Here is my paint prep process:
Step 1: Fill all of the holes, divots, scratches, etc. with drywall mud. You can use spackle too, but drywall mud is way cheaper so I usually have a gallon bucket on hand. I usually take a flashlight over the wall to see any spots that need filling. Let dry.
Step 2: Caulk any seams or corners. In this case, I caulked not too long ago so I didn’t need to do this, but if you just put up trim or you have trim that has pulled away from the wall, you should add caulk (if it is new trim, you probably need to do this step 2x).
Step 3: Sand the areas you just filled with 120 grit sandpaper/sanding block. Also, sand the entire wall… or at least take a flashlight to see any bumps, ridges, hairs, etc. that got stuck in the paint before.
Step 4: Fill all of the holes again. Some won‘t need a second coat, but most will. The hole will typically suck in the mud. If it is a huge hole, you may need more coats or to first fill with an actual piece of drywall. I scrape off as much mud as I can so it is just skimming the hole.
Step 5: Wipe all of the walls down with a micro fiber sponge. This will both clean all of the dust off of the wall and will also allow you to wet sand the areas you filled. This will give you the smoothest walls. If you put on too much mud in the previous step, you will struggle to get it off with the sponge… so you may have to let it dry and sand with 120-220 grit sandpaper first.
Unfortunately this paint prep process can take as long as 2 days depending on how big of holes you have to fill. But it truly is worth it for the final result. Once you have done your prep work, it is time for the fun part - the paint!
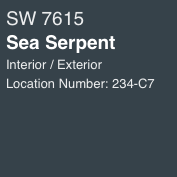
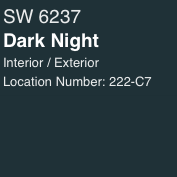
So I painted 2 coats of the Fleur de Sel on the walls. But I knew I wanted to make this hallway MUCH less boring, so I decided I wanted a focal wall for the back wall. I got a couple of samples, one of SW Sea Serpent (Left) and SW Dark Knight (Right). I really thought I would want the dark knight with a little more green in it but I just LOVED the Sea Serpent. It is a super dark blue with a lot of gray in it depending on the lighting. Winner winner chicken dinner!
Since I had this huge can of paint, I figured, lets really spice things up and put the Sea Serpent on both the back wall of the hallway AND the ceiling. I have never painted a ceiling any color other than white. I used to not be very daring. But this year, I decided that in my own house, I was going to push myself a little bit out of my comfort zone.
So here is my theory on paint. In the grand scheme of things, paint is a whopping $60 a can for decent paint. A room may take a weekend, at most, to paint. So… if I really hate something that I have painted, I’m out $60 and a weekend of my time. BIG WOOP. I understand it is a little different if you have super high ceilings and have to hire it out, but not the case for the majority of people out there, including myself with my 8’ ceilings in my tiny ranch house. So, JUST GO FOR IT. It is totally fixable easily and cheaply if you don’t.’
With that being said, I think it is important to follow a few tips of mine for choosing a paint color. You shouldn’t just shoot from the hip totally.
Here are my few paint selection tips:
- Get samples, paint them on the wall or a large piece of cardboard to tape to the wall.
- Paint a large spot/cardboard - a 5”x5” square is pretty pointless. I painted 2’x4’ samples here and would have gone wider if the back wall was wider.
- It is even better if you can get the samples in the sheen you plan to use (I used Matte finish on all of these walls).
- Paint samples in more than one area if it is a larger space. Paint can look differently on different walls.
- Look at samples during different times of the day to see what the colors look like with natural vs. artificial light.
Now that you have selected your color, GO FOR IT! So I painted my Sea Serpent on the back wall and the ceiling! While I know that I have to add a can light in the back of the hallway (always in the plan), I really like it. I mean, I kinda want to paint all of my ceilings some sort of color now! OK, well maybe not all, but I already have some of my next projects in mind that I want to paint the ceiling!! Totally digging it!

So next up, lighting. I put the previous light in a few years ago. My house was a little more modern-farmhousey then. I have been slowly moving toward a little more contemporary-transitional with a touch of rustic/coastal/cottage. But the old light didn’t really bring me a lot of joy. So I found this SUPER cute white/brushed gold fixture for $100 at Target. God, I love Target. Especially the Studio McGee line. I’ll be honest, it is not always super high quality, but I mean, it looks great and is cheap… WINNING!
I really wanted something white to pop against the dark blue and I fell in love with the scalloped detail. Of course I saw it and it was in stock and then when I was ready to pull the trigger…. Out of Stock. Luckily they have the text notifications. I’m not sure if they were getting one in at a time at once, but it notified me like 15 times they were back in stock and I would immediately try to buy… back out of stock. Finally a couple of days later it came back in stock at like 6am… luckily I’m a morning person and apparently not many people are. Got that sucker!
I’m going to tell you that 6 months ago, electrical was something I wouldn’t touch. No changing outlets, no anything. But, the One Room Challenge really gave me some confidence because I really wanted to do almost all of the project myself. And I have just been gaining more and more confidence the more projects I do. So I have learned how to change outlets and light fixtures. And guess what?!?!? It is SO EASY! So I swapped this fixture out in like maybe 10 minutes. I can’t even believe I used to have to wait for someone else to come and do this for me. This is my way of telling you, if you are nervous about trying a new thing, for the love, just do it! You totally can do it.

Last but never least is the decor updates to this space. I kept my Walt Whitman word art. I’m pretty against word art in most places except maybe an office or a gym… but damn I have loved this particular piece for YEARS. It brings me a lot of joy. So I’m leaving it, despite it being against my design rules. If you really love something, please throw out all design styles and rules, just enjoy what you love. The quote is my all time favorite and brings a smile to my face literally every time I walk by it. And the typography of this particular print is awesome - it just makes the quote every better. But I added some greenery to spice it up - because it just needed something. And greenery makes almost everything better.
The Sea Serpent wall definitely needed something light to balance out the darkness. I had a natural wood frame with a heavy white mat that was too big for my office project but I got on sale at Target (they seriously have the best and most economical frames)! I found this super cool pic I took of the Ambassador bridge (bridge over the Detroit River going from USA to Canada). I took it from the water and I just LOVE it. I made a few adjustments - aka turning it black and white and reversing the orientation so you can read Ambassador Bridge - and printed it at Fed Ex Office for like $.65 on nice card stock. Yes, you read that right. My artwork for that wall cost me less than a dollar. And the frame was only like $18. And this might be in my top 3 favorite things on the wall in my house.
Lastly, the big open wall that is both in the kitchen and leads down the hallway. I used to have my turquoise shutters on that wall. I’ll tell you a SUPER brief story about those. After 8th grade, my parents moved us into a new fixer upper that was tiny with turquoise trim, doors, and shutters. The room that would become mine was lime green walls, carpet, and ceilings. I seriously cried when they showed the house to me. Weirdly, lime green is my favorite color now!! And luckily, my mom saved one set of shutters before getting rid of the rest. And they have come with me to every house I have owned except for 1 (my first). They have the perfect combo of peeling paint; turquoise, blue, and green with natural wood deep down. They are so freaking cool. But time for a new spot, don’t worry, still in my house (always and forever) but just not in the kitchen/hallway.

So instead of the shutters (don’t worry, they are sentimental and will be going elsewhere in my house), I went with a grouping of 3 oversized frames, heavily matted, but with an offset mat which I really like since everyone and their brother is doing the square frames/mats. Again I utilized my buddies at FedEx Office to print me off 3 different sunset shots of the lake (Lake St. Clair that we live on) that I have taken since I have lived here. Jeremy and I LOVE a sunset cruise and this was an inexpensive way to capture what we love on our walls. I’m also not a huge fan of putting personal pictures of us/family/dogs/etc on the walls in main living spaces. These prints cost me $6.35. The set of 3 frames from Target cost me $95. So 3 giant frames/art for the wall for about $100. That is kinda amazing! And the best part is, I can update these pictures any time I want. So, if I find a new sunset or a new grouping of pics that I love… it is around $2 a color print. That is freaking awesome!
The last touch is a new, super cute Jute woven rug. Man am I obsessed with Jute rugs. I think they just provide so much warmth and texture to a space!! And with the gray LVT flooring, this hallway definitely needed some warmth. I especially love this rug from Crate and Barrel because it has both off white and natural jute woven together to give it a really nice look. And I’m a sucker for the fringe. I got a second one for my kitchen update!
So, here is my cute little hallway update - from modern farmhousey boring to a little more coastal+traditional with a touch of contemporary. In the grand scheme of things, I had to repaint everything in this hallway anyways, so for the same cost and time as just keeping it the same, the wall/ceiling paint made a HUGE impact on this space. Like, holy moly, who would have thought a little navy paint on the ceiling and back wall could make such a difference! And a few new frames, a new light fixture, and a new runner… we are talking about approximately $300 ($375 with paint but I had to buy that either way). Some of the best $300 I have spent. Freaking. Love. It.
So this is my plead to you… paint is the magical design tool - cheap and quick… USE IT! If you have to repaint, it is not the end of the word. Try out something a little bit bold. And for the love, find a room to paint the ceiling something other than white!
Happy DIY + Designing!
Katie


Comments