
Chevron Slat Corner Wall Tutorial
- Katie
- Jun 2, 2022
- 10 min read
DIY How To's

These walls took me a long time!! This is partially because I had to do it a little bit at a time when I found the spare time and also the weather only somewhat was cooperating. I was trying to do this in April in Michigan... not the most consistent weather time. And we also had an unseasonable cold spring and I had to do all of my cutting outside! BRRRRRRR! Those of you in warmer weather or with a workshop, I envy you! After all of the time and effort though, I am absolutely in love with how these walls turned out.
A quick little background of why I decided to do a double plank focal wall. These were walls in my new home office (changed from an old dingy guest bedroom - check out the 8 week transformation of the whole room for the Spring 2022 One Room Challenge here)! I love the dimension molding can add to a wall and I was going for a little bolder design in this space.
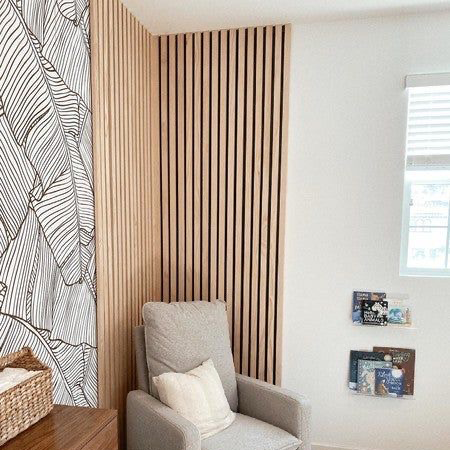
Slat walls always have caught my eye so I initially started with the plan to just do vertical slats across one wall. Since I was painting the small room black, I thought I needed something to break up all of the black so I then thought, ok, maybe we can do a mix of natural wood planks and black planks. This is also when I was thinking that this would be the perfect corner to put a lamp, chair and table for a little reading corner. Below is the initial inspiration that got my ideas started.


In addition to making these walls look cool, I also thought that the slat walls would help with soundproofing this room. I work mainly in my house as an interior designer and am on the phone or zoom frequently. My fiancé also works 100% of out our home when he isn't traveling and is on the phone or zoom all day long. His office is the front room of the house that is open to the rest of the house. It also shares one wall with my office and the other wall of my office is shared with the hallway open to his office. Needless to say, we are close to one another and need all of the soundproofing we can get! I’m no sound engineer, but I think adding density plus doubling the surface area of these 2 walls with slats should dramatically reduce sound transfer from room to room based on my little bit of research.
So anyways, lets get down to it. The two walls I was using were 10’6” and 10’9” with 8’ ceilings. Obviously if your have a bigger or smaller area that you are doing, you will need to adjust the material amount. But here is what I used to make these walls happen.
Material List:
- 2 sheets of 1/2” 4’x8’ sheets of MDF
- 1 sheet of 1/2” 4’x8’ sheet of sanded Birch plywood
- Wall Paint (I used Sherwin Williams Emerald in Matte sheen - my color is SW Black Magic)
- 2” finish nails for my brad nailer
- spackle or drywall mud
Tool List:
- Miter Saw (I use the Milwaukee M18 Miter saw)
- Table Saw (I use the Bosch portable Table saw)
- 4’ Level
- 2’ or mini Level with 45º level
- Orbital Sander (I use the Milwaukee M18 Orbital Sander)
- Finish Nailer (I use the Milwaukee M18 Brad Nailer)
- Staining Rags
- Paint brush
- Sanding block
- Measuring Tape
- Pencil
If you are doing this by yourself like I was and cannot run 8’ boards through the table saw by yourself, you will also need the following:
- Circular Saw if you are doing the project by yourself like I was (I use the Makita corded 8” circular saw)
- Clamps
- Weights to hold down guide board

The first thing I did was plan out my pattern and spacing. Being a designer, I used AutoCAD frequently which is a great tool to plan out the pattern on your wall. This helped me visualize what the slats would look like up on the wall and determine my spacing. (Since it is likely most of you do not have access to this, you can sketch to scale as well - or always could reach out to me for AutoCAD drawings). I also knew I didn’t want my chevron boards to be longer than 4’ pieces so I didn’t have to waste a lot of the wood and could cut my plywood sheet in half. At this point I wasn’t exactly sure how I was going to accomplish the chevron pattern but I knew I would use a 45º angle so I could use my framing square or something to get that angle right. I played with several thicknesses and spacing of the slats but decided on one to plan out my material needs. I figured out that I would only need 2 sheets of MDF and 1 sheet of plywood which was great news because everything, especially wood is crazy expensive right now.

So I went to get my 3 boards at Home Depot. I had the lumber associate cut down my boards to make them a little bit more manageable. I had him cut the plywood in half to create two 4’x4’ pieces. I had him cut the MDF boards in half lengthwise to create 2’x8’ pieces and then headed home to start my own cutting!
Like I mentioned before, I was cutting these all by myself, so I didn’t really have a way to run the 8’ pieces through my table saw because I didn’t have a way to catch them on the other side. So I had to get crafty and do it the slow way. How I do this is to lay out my boards and mark the distance I want cut plus the saw blade is from the edge of the guide on my circular saw. I then line up a second straight board to my marks and clamp them on either end. Because there is some flex to 1/2” MDF and these are really long boards, I used something to weigh down my top guide board along the middle. Well, I actually didn’t do this originally and then the deck of my circular saw kept slipping under my guide board and making my strips all wonky so I learned and adjusted!! I just grabbed what I could fine which was a spare propane tank and some boxes of tile for my next project!

Before I went crazy and ripped all of the slats down, I cut the first slat at the 1 1/2" I originally planned on. I didn't really think I liked it when I held it up in the room. So I cut one at 1" and I didn't really think I liked that either so I did a 1 1/4" and stood them all up to make my final decision. I'm glad I did this test because 1 1/4" was definitely the winner! Then I started cutting away. I cut up all of the boards and had about 75 pieces. The last 2 cuts I had to wait until Jeremy came home to rip on the table saw because you can only move your guide board back for the circular saw so far.


The 4' plywood pieces I figured I could manage on my own through the table saw but I still needed something to catch my pieces as I slid them through. I stacked up some boxes and boards on top of my saw horses until it was just below the deck of my table saw. And that did the trick perfectly. I wanted these to be the same thickness as the vertical slats so they were all cut to 1 1/4" as well. The table saw is about 100 time faster!


In order to prep all my slats before I started putting anything up, I put a coat of the same black paint that was painted on the walls on all of the 8' pieces. This took forever. The edges of MDF are rough and just suck in paint so it took so long to paint all 75 of them with a brush by hand.
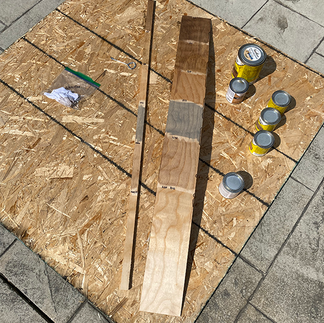
The plywood boards were easier because I was just staining them, but I had about 75 of those as well. I tested multiple stain colors first to see which one would give me the light wood look I was going for and natural was the clear winner. I probably could have (and maybe should have) put a coat of polyurethane on these but I figured they would be on the wall so they really shouldn't get dinged or touched so I just left them as stain.


Now it was time for the fun part. I had gone back and readjusted my CAD drawings with my new sized slats to see how the slats would land around the doors and switches. I started at the door trim and worked my way out so I could avoid as many notched cuts as possible. I also knew I had to be no more than about 34" off the corner of the wall for the 4' pieces at a 45º angle to work.
So I started putting the boards up one at a time. I wanted a slightly smaller space in between the boards so I went with a 1" space and used the 1" MDF piece I had cut earlier as my spacer piece. I also used my level as I put up every single board. I'm sure some of my cuts were not 100% perfect so I could adjust each piece to level as I put it up. This is important. If I just leveled my first one and went off the spacer for all of the other ones, I'm willing to bet the slats would have gotten more and more un-level as I went. It takes longer to do it this way but just do it. Its going to take even longer when you have to take them all back down.


I nailed everything with 2" trim nails using my Milwaukee M18 Cordless Brad Nailer (probably my favorite tool we own)! I could have added glue as well since most of these were not going into studs but they don't seem to move at all. If you are worried about them pulling out from the wall, angle your nails in opposite directions slightly. But honestly, who is going up and pulling on these things? No one. And I didn't want to totally screw the person that decided to take these down one day by gluing every one of these... it would destroy the drywall.
The only exception is that I glued the slats above and below the light switches. I knew the electrical runs straight up from the switch into the ceiling and also I believe that it runs down to my breaker box in the basement. I did not want to chance hitting the electrical with my trim nails. I also did not put any nails along the horizontal line between outlets. Typically the outlets are all tied to one another on the same circuit and are connected in the wall with wire running horizontally through the walls to tie them together. I just made sure I didn't shoot any nails through that general vicinity.


To make my switch faceplates sit nicely, I boxed in around the switches with my slats. This required me to push out the actual switches in the boxes and put the little ears of the switch on the slats I used to box in the switches. I had to get longer screws to make this work. I continued to put up slats over toward my focal corner on each wall until I passed the 34" mark I made with my final vertical slat. I did this on both sides but truth be told, they are not the same distance off the wall since I started in different places. But no worries, there is absolutely no way to tell. They are within about 1/2" of one another!

Before I could start putting up the wood chevron pieces, I needed the black vertical slats to be totally complete. So I had to fill all of the holes.... and there were SO MANY HOLES. After I sanded, these two walls got a last coat of wall paint over everything.
For the chevron pattern, I knew I had my work cut out for me! I had never done a design with a compound miter like this before. My mitering skills are iffy as it is. But I was just going for it! So I started cutting the compound 45º/45º angles on the each slat opposite of one another so they would meet up in the corner. These pieces were too long, but I need to cut the hard cut first and then I could trim down the other end a little bit at a time when I got them lined up.

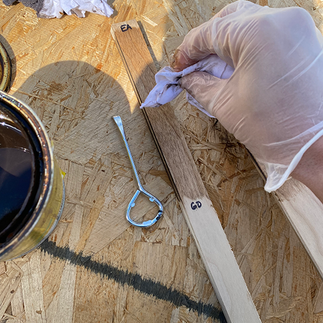
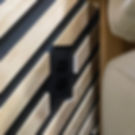
I found that (not surprisingly) my walls are not square and the drywalled corner is a little bit rounded from their taping the corner. I didn't want to cut the drywall tape and ruin the walls so I had to play with the degree of angle piece by piece. Most I cut were about 43º to make the middle come close to meeting up but I adjusted as I went. You can see the difference between the first cut I made at a 45º and the second one I adjusted to a 43º above. You may have to cut it a few times to see what meets up the best.


Now that I kinda had my angles figured out, I could start nailing. I did these one by one, right side first then the left side, having to run out and cut each one individually every time. Extremely time consuming. Originally I thought I was going to use my framing square to ensure the boards were at a 45º angle down to create the chevron pattern but I found that since my corner was a little wonky, it would be consistent. So I got my mini level that has a 45º level tube and used that on each and every piece. I would have to adjust them slightly frequently from the spacer piece.
For the outlet, I decided I didn't want to box it in because I thought it would look weird boxed in with the natural wood color and stick out like a sore thumb, so I just ended the natural wood right at the outlet faceplate. This also made the outlet recessed by 1/2" so when things were plugged in, the plug won't protrude out so far. That was an inadvertent positive!
The finishing touch on the chevron wood slats was to fill the nail holes with wood filler. I used the Varathane wood putty in Natural and wiped clean with a damp paper towel. If you look really closely you can still see the holes because the wood putty isn't a perfect match but you can't see any of them from a foot or two back.


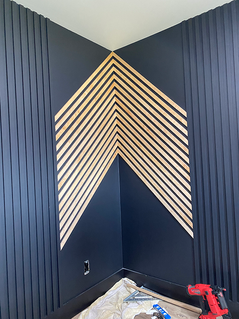
With that, the 2 slat walls were complete! And they looked SO GOOD. Man these took a lot of time, effort, and patience but they sure were worth it! The black vertical slats add so much dimension without being overpowering to allow the focus to be on other parts of the room, mainly the chevron corner. The natural wood pops so beautifully against the black but honestly would look gorgeous against most paint colors - just go bold! Having the chevron wrap around the corner carves out such a unique area that in this room is the perfect spot for a sitting area to read and drink my morning coffee.


I would love you to drop me a line and let me know what you think of how my slat walls turned out and if you are trying this yourself! If you have any questions about this tutorial, I would be happy to talk you through anything I did! Thank you for reading!
Happy designing + DIYing!
Katie