
Home Office Transformation - The SLAT Walls
- Katie
- May 10, 2022
- 9 min read
One Room Challenge - Week 6

We just wrapped up Week 6 of the One Room Challenge and HOLY MOLY was it a week! I have had this 2-wall slat focal wall designed in my head for quite some time and knew that it would push my abilities but wow, I definitely did not anticipate how much time and effort it would take. That being said, I am SO IN LOVE with how it turned out!! I will walk you through the high level overview of everything that went into this week's work, but will also be posting a full tutorial on how I accomplished these 2 walls, so stay tuned!
If you have not checked out Weeks 1-5 of the One Room Challenge, you can check them all out here to see how this room started as a dingy guest bedroom and is slowing being transformed into my bold and beautiful home office! Also, please check out all of the many insanely amazing transformations happening for the Spring 2022 One Room Challenge! I can't believe all of the unbelievable projects happening with this event all over the world! There is so much creativity, skill, and talent happening, I LOVE IT!!!
Let me give you a little bit of background behind these 2 focal walls if you haven't been following along thus far. I wanted to do these walls for a multitude of reasons. For one, I really love vertical slat walls painted all in the same color. I think they add so much dimension to a wall, but in a subtle, not in-your-face kind of way. But, since my walls are all black, I wanted to lighten up some of the room, since it is a pretty small room with only one window. So I wanted to add some natural wood to one of the corners, since my corners get the least amount of light in the room. The corner I chose for this is where my little reading chair will go, so it is the perfect spot to highlight.
Lastly, these walls are the two walls that share the space that my fiancé, Jeremy's, office is open to. We both primarily work from home and can be on the phone/zoom frequently so I wanted to silence as much of the sound as possible between offices. I am absolutely no sound engineer and just shooting from the hip based on my minimal research of soundproofing, but, my thought is, adding slats to the wall should increase the density that the sound has to travel through since the material I am using is solid. The slats are also, in essence, doubling the surface area of those walls for the sound waves to bounce off of. At the very least, it can't hurt. And now that the slats are all installed, I do feel like it is quieter, but, who knows if that is just my brain telling myself that :)!


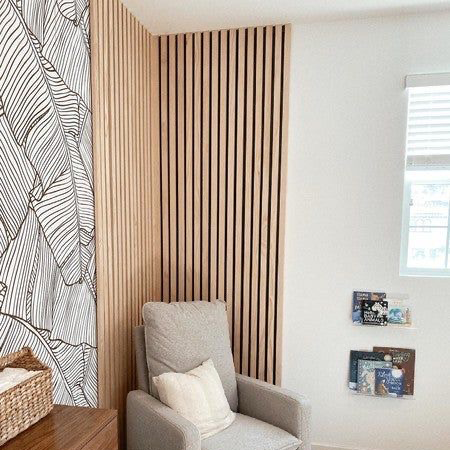
Above are some of my inspiration photos that I used in creating the design of this wall. I knew I wanted vertical slats painted in black plus some other design wrapping around the corner to really draw your eyes in. So I kinda combined these with a twist of the chevron pattern that I love (and will have in other parts of the space as well). Being a designer, I used AutoCAD frequently and pre-planned the layout to determine how much material I would need and the size of the planks/spaces I thought would look best and how they would interact with the doors on the walls.


It is always a good idea to draw out your plan before you start the project. This will help eliminate waste of materials or making another trip back to Home Depot. While you may make adjustments along the way, I find it is far less stressful when you know your plan before starting. You can see I did about 5 different AutoCAD drawings before I thought I was ready to begin! No matter what your project is, always have a plan!

The materials I planned on using was MDF (medium density fiberboard) for the painted vertical slats and birch sanded plywood for the chevron natural wood slats. All of my boards would be 1/2" thick as this is the thickness of my baseboard and trim I will be butting the slats up to.
I chose MDF because it has a very smooth surface on the top and is always straight. It doesn't have the tendency to warp in the store like wood sometimes does. Now the downside to MDF is that the cut sides are a little rough. They aren't the best finish quality, however, these planks are going to be spaced about 1" apart and painted black so it will be hard to see that edge in detail, so I really do not think you will notice the rough edges. MDF is also cheaper than sanded plywood and wood is just crazy expensive right now and I'm on a tight budget for this space! I needed 2 4'x8' sheets of MDF for these 2 walls. I had them cut them down to 8 pieces of 1'x8' strips at Home Depot to make them easier to work with.
For the chevron pattern, I used 1 sheet of 4'x8' birch sanded plywood. I purposely designed my chevron pattern to need less than 4' pieces on each side so I could get away with only using 1 sheet and didn't have to waste much. I like birch because it has some good color variation and it is typically the most cost effective. I think this sheet was about $70. I could have used solid wood boards in select pine or maple or something of the such, but this would have cost me around $350. The thing about plywood is that it has a nice birch wood veneer on top of 3 layers of other wood in the middle. So if the sides will be exposed like mine will be, you will see the 3 layers. I am actually ok with this. They are typically varying colors of wood and will give a little more dimension to the look. But you could absolutely use solid wood. Cutting strips of plywood also allows me to ensure the strips are straight since I'm cutting each piece from the giant board. If you get pieces of solid wood, likely they are a bit warped and will be harder to nail up and keep straight (I learned this lesson from other projects).

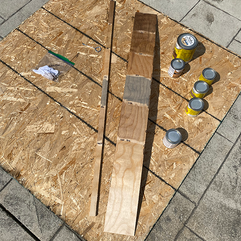
Once I got all my boards home, I wanted to start cutting my planks. I had planned my planks to be 1 1/2" wide so I cut one strip of MDF at that to see how it would look. I realized I thought that was too wide so I went down to 1" - too narrow. 1 1/4" was perfect. I did a quick adjustment to my AutoCAD plan to see how the 1 1/4" planks would fall with a 1" gap and then started cutting. I didn't have anyone to help me on the day that I was cutting so I had to get a little bit creative. 8' boards are a little too long for me to handle on my table saw alone, so I used my circular saw with a guide. And when I say guide, I mean another straight strip of MDF held in place with clamps. Sometimes you gotta get a little creative right? The 4' pieces of plywood were easier to do on my table saw, but I didn't have anyone to catch the boards for me, so I just made a little catching table by stacking up some old boxes on top of scrap OSB and my saw horses.


So 70 MDF strips and 76 plywood strips later, I was dusty and done cutting! MDF makes A LOT of dust! But then I had to pre-paint and stain the strips. Since the weather is anything but consistent in the Spring in Michigan, I did this part inside because the weather has not been super cooperative. I painted all 70 MDF strips the same black color as the walls (SW Black Magic) with 1 coat. I tested several stain colors on a scrap piece of my plywood and determined that Natural was the color I wanted to go with. It just added a slight richness to the natural birch color.


Once everything was painted and stained (this took me seriously like 10 hours to do this step), it was time to start putting everything up! I started with my vertical MDF pieces. I cut them to length in batches of about 5 as my house is anything but level, so the length of my pieces varied as I moved down the wall. I had a 1" spacer board that I used in between boards, but I used my level to ensure these boards were straight on every single board. In a perfect world, I could level the first board and build off of that with my spacer for every other board, but my walls aren't straight and my cuts probably were not perfect, so I would have to make slight adjustments every few boards. For the switches, I framed them with pieces of the MDF so the faceplates had a level surface to sit on.


Before I jumped into the chevron wood pattern, I filled all of the holes (so many holes!) and painted everything again with one more coat! I feel like I have seriously been painting forever for this renovation! Then it was time to start the chevron pattern. Everything was pretty easy up to this point. I have never done a compound miter before (meaning it was a 45º angle in 2 different directions since it was a 45º to make the chevron pattern and another 45º in the other direction to wrap around the wall). I'm definitely no trim carpenter and my walls definitely are not straight or level in my house! But here we go!

I started by cutting the compound miter first for the corner, and then could mark and cut the other end to size from there, since that side was an easier cut. I used my level that has a 45º level bar on it to know what angle to attach the boards to the wall. THIS. TOOK. FOREVER. Omg, I totally underestimated how long this would take. First off, since the corner of my wall was definitely not a perfect 90º corner, I had to adjust my cuts a little to about 43º to make the corners line up a little better. You can see the top corner is what I did at 45º and the bottom was at about 43º. I had to cut each piece one at a time and work down doing both sides before moving to the next piece. There were many adjustments to line up with the level. This took me about 8 hours to complete this section of the wall. I used Varathane wood putty to fill the holes and she was done!


Holy crap did these 2 walls take me so long from start to finish, but once it was done, OMG did it look fabulous. I'm not going to lie, I'm pretty freaking ecstatic over how it turned out AND that I was able to do this with no help from anyone. Not even a "phone a friend" call to my dad! I'm pretty proud of myself on this one and it definitely helped grow my confidence with doing these type of walls!


One of the last things I did this week was putting up my closet doors. The doors were no short task, but everything feels quick in comparison to those walls! I ordered new doors to match the rest of the doors in my house (and what a difference in comparison to the 70's mirrored bi-fold ones that were there before)! I didn't want bifold doors and bypass doors would really only allow me access to half of the closet at once. Being such a small room, having doors swing open just takes up too much usable space in the room itself. So I decided on double bypass barn doors, so they both could slide over to the side of the opening for full access. I didn't want that farmhouse-y look though so I got the hardware that attaches to the top of the door instead of the front. And since my walls are black, the black sliding door hardware kinda disappears into the wall which is what I wanted!


Well, it was a LONG week of so many hours spent on this room, but, it is SO CLOSE to being complete! I'm so pumped to have my office done and ready to use! I would love to know what you think about how these walls turned out this week! Stay tuned next week when I modify some inexpensive furniture to give a custom and one of a kind look! Thanks for following along!
Happy designing + DIYing!
Katie
Check out the previous One Room Challenge posts:
