
Very Unique Custom Vanity
- Katie
- Feb 27, 2022
- 7 min read
Updated: Mar 30, 2022
Welcome to Shiawassee Street (Part 7)

So you have probably been following along with this crazy house thus far in Parts 1-6 (if not, check them all out here)! By now you know that the main bathroom started out as a very dark and scary pink and olive green bathroom. In Part 6, I walked you through the process to put the bathroom back together including the traditional subway tile walls paired with the gorgeous Carrara marble basketweave floors.


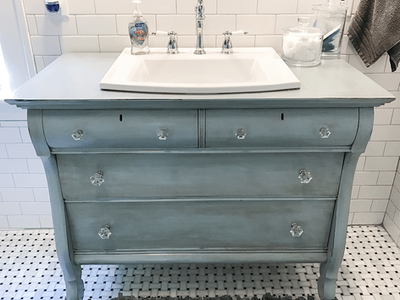
When it came time to figure out the vanity, I didn't have a huge budget so getting a custom vanity from a custom or semi-custom cabinet maker was out of the question. I did my shopping at the big box stores and saw 8 million white or gray shaker vanities with Carrara tops and I just couldn't put such a boring option in my little bathroom that I worked to hard on. I love character and one-of-a-kind pieces. And I love to reuse things that have a story behind them. Enter in the really old antique dresser that my mom had. I believe she said this may have been from my great grandma... so it was pretty old. The finish on the wood was in a little rough shape but the dresser itself was solid. This was it! The perfect, unique piece that could be transformed into something new! Yay!
I will warn you, I did an absolutely horrible job at documenting this process. And when I say horrible job, I just didn't do it. At all. As in, I took 757 pictures of this house and the process I went through to renovate it, and I took ZERO of turning this dresser into my vanity. I don't even have a before picture. I don't know why I just totally forgot to take pictures every step of the way for this particular project, but here we are. I do know, however, the whole process I followed including all the materials I used so I will walk you through it the best I can and add some images from the Google to help! Sorry about that!

The vanity started off similar to the above image, a solid wood antique dresser. What I really liked about the one I was using was the cool little wheels on the front legs. That gave it an added little touch of character and that "old" feel. I knew I had to make room for the plumbing so the top two drawers would become false drawers and the middle, full drawer would have to be adjusted to work around the plumbing. Besides the existing medicine cabinet, this vanity would be the only storage in the bathroom, so I wanted to maximize the storage as much as I could in this vanity.
Back when I did this project, refinishing old furniture wasn't as crazy popular as it is now so there weren't a plethora of tutorials on the best way to do this like there probably is now. I was just kinda shooting from the hip at the time. When my dad was in town to help me hang drywall and cement board in my bathroom, I also asked him to help me with the drawers. My grandpa was an amazing woodworker as a hobby and my dad learned a lot of stuff from him so I figured we could modify the drawers to work as a vanity.

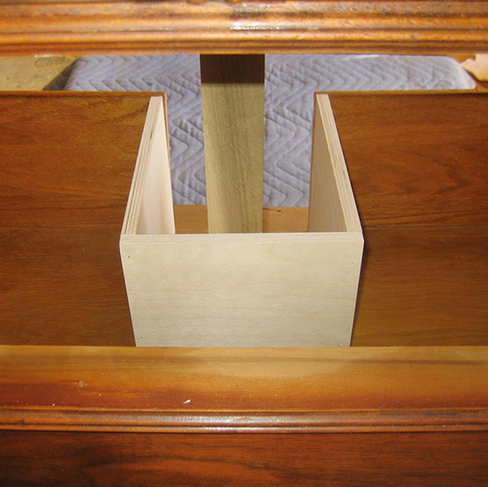


We notched out the middle drawer similar to the first image above to allow the drawer to move around the sink plumbing (image from HGTV). We then cut out the hole on the top of the dresser for the drop in sink (second image is basically what we did - image from An Oregon Cottage). I was super nervous about this part, because if we cut wrong, there was no fixing it. The top of the dresser was going to be the top of my vanity. Because of this, I chose this drop in sink that had a decent thickness of porcelain around the edges to keep water on the sink part instead of the dresser top. A lot of people do vessel sinks when they are repurposing a dresser into a vanity, but I'm not a huge fan of vessel sinks and it didn't really go with the look I wanted. I also liked the slight curvature of the front of this sink and bonus, it was in stock so I didn't have to wait for it to come in (which was important since I didn't plan ahead and my dad was only there that weekend).
Since the inner workings of the vanity were all ready to go now, I could start the finishing process. I planned to use chalk paint because it is so easy to work with and basically sticks to everything. In a previous project, I made my own chalk paint to get very specific color and that worked out really well. Back when I was doing these projects, chalk paint only could be tinted in certain colors at the store or online and I couldn't tint to a another color (which is why I opted to make my own in the previous project). But I wanted to see if the store bought chalk paint was any better than my home made concoction and I really liked one of the colors in stock.

Since the bathroom was pretty much white, gray, and black, I wanted to give a touch of color to the space. I opted for a soft blue color for the vanity. I used Valspar Chalky Finish paint from Lowes in Trousseau Blue. I gave the dresser a very light sand first with 220 grit sandpaper and wiped everything down. Like I mentioned before, chalk paint basically sticks to everything and requires very little prep work or primer before applying the paint which I love! Anything that takes a few extra steps away is a winner in my book. And my previous chalk paint project held up super well on chairs so I had some confidence it would work this time. So I painted the entire dresser and drawer fronts with the chalk paint - 2 coats. This paint is SUPER thick and covers really well. Who knows, I may have only needed one coat but wanted to be safe.
I wanted the vanity to look weathered, so I took my 220 grit sanding block and took off some of the paint down to the wood around the edges - basically where the dresser would likely have gotten wear over time if it naturally rubbed off. Don't go too crazy with doing this, otherwise you can tell that it isn't really natural wear.
With chalk paint, you have to use a finishing wax to seal the paint and protect it. I used Valspar Sealing Wax. The clear sealing wax needs to cover everything you painted. But there is a process to doing this. Work in small areas and paint the finishing wax on with a brush. Let it sit for 1-2 minutes before wiping off the excess with a rag. I rubbed in circles pretty hard to make sure I didn't leave any excess and left a smooth finish. Take it from me, if you work too far ahead and the wax dries too much, it is SO HARD to rub it smooth. I learned this on my previous project. Slow and steady is key here.
They also make what is called an antiquing wax as well that is supposed to make the item you are refinishing look, well, antiqued! I figured I would give it a try since I was going for an old and weathered look. Let me tell you, this stuff is really dark and a little goes a really long way, so use very sparingly if using this product. It actually dramatically darkened the light blue and I tried to rub as much off as I could to just give it a very subtle antique look. I think this would work better with darker colors of chalk paint and would probably only used it again if I was using a way darker color paint.
Since the wood top of the dresser would be the vanity top, I wanted to make sure it was extra protected from water. Even though the sealing wax should protect the wood from water, I wasn't sure if it would stand up to repeated, everyday water abuse. So I put about 10 coats of Polycrylic on the top surface. Polycrylic is a water-based version of polyurethane which makes it nice because it doesn't have fumes and you can clean up with water.


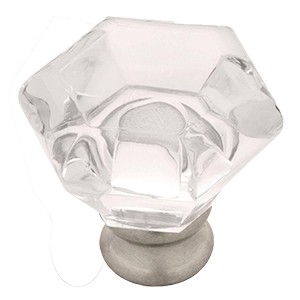
Finally, I was ready to add the finishing touches and install this bad boy! I dropped in the Kohler Archer Sink and added a really pretty Kingston Brass widespread chrome faucet with white handles that really paired nicely with the traditional, antique feel of the bathroom. It also would tie in to the kitchen faucet I had purchased. I added these fun crystal knobs to the drawers to complete the look! Then I attached to the wall and hooked up the plumbing to finish off the bathroom! For about $350 in total materials plus mine and my dad's labor, I had a super unique statement piece in this 100 year old bathroom. Not only did a save probably $1000+ but also this looks SO MUCH BETTER than one of those white or gray shaker vanities with a Carrara top that everyone and their brother has in their bathroom. Now the house was finally at a point where I could move in and live simultaneously while I finished the rest of the renovations! Woo hoo!


After move in day, the next step was to put the kitchen and laundry room back together and paint, paint, and more paint. If you missed any of the previous parts to this series, check them out below. Stay tuned next week to see how I turned something else old into a one of a kind piece in this house! Let me know what you think of this antique dresser turned vanity!
Check out the previous parts to the Welcome to Shiawassee Street blog series here: