
One-Of-A-Kind Laundry Wainscoting
- Katie
- Mar 3, 2022
- 6 min read

Updated: Mar 30, 2022
Welcome to Shiawassee Street (Part 8)

Two of my all time favorite things when coming up with the design of a space are:
Creating a feature that no one else has and is truly unique to that design/space
Reusing something from the house to keep some of the original charm (even if the things being reused were not very charming to start off with)
If you were with me last week, you saw an old dresser repurposed into the main bathroom's vanity. And I love, love, loved how it turned out! (If you didn't catch Part 7 last week, you can check out it here or find all parts of this blog series here)! That vanity really got me on the hunt to add more charm and character to this 100 year old house!


If you remember the layout from Part 4, there was a small room on the back side of the kitchen that was awkward and (at the time) useless space. It also housed the powder room. When I was designing the main floor, this room wasn't really big enough to be much, but was the perfect amount of space to squeeze in a main floor laundry!! And if any of you have ever been in the basement of a 100 year old house, you likely know that doing your laundry down there is not fun, and well, kinda scary! So it was the perfect opportunity to bring it up a level to the main floor (to also be closer to the bedrooms and bathroom where the majority of laundry was being created).
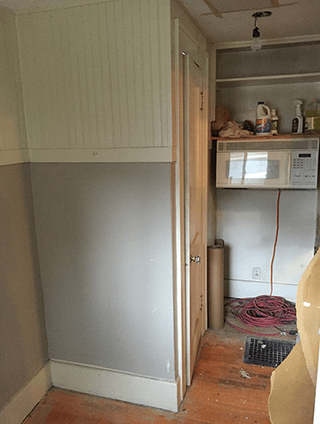
You can see in the before pictures below how small the space was and not in the style I was going for in this house! It had paneling on the lower portion of the wall that was made to look like tile and the top was tongue and groove bead board. I did really like the idea of the wainscoting look though - just not with the particular materials used!


Being directly off the kitchen made it a bit of a strange place for a laundry room and the fact that you could see directly into it from the kitchen made it important that I packed some punch into the design. But I was not ready to spend an arm and a leg to make one of those gorgeous Pinterest laundry rooms that few people actually have in their house (at least not many people I know). I mean, let's be real.... my budget was around $500, not $10,000. But that is a fun challenge for me. Tight budgets don't have to mean boring, you just have to get a little creative.
Enter in - the pile of picket fence sections that had recently been taken out of the front yard.


When I first purchased the house, the old used-to-be white picket fence surrounded the corner lot. Because I had dogs, it was one of the first things I replaced in the house because the yard had to be fenced in with a sturdy enough fence to keep my two escape-artist boxers from getting out.

There was no modifying or fixing this fence to make it usable for dogs. Plus it looked horrible!! When I took it down, I didn't have a dumpster yet, so into the garage it went and got forgotten about. Until one day I looked at it and knew there was something I could use it for! When it came time to figure out what my laundry room would look like, I figured it would be the perfect place to use some or all of this fence! And since this wood was made to be out in the elements and had been reclaimed from the front yard, it had already survived rain, snow, and sun so it should be pretty durable when it came to daily use in a laundry room.
With my laundry room down studs and ready for drywall, I decided to disassemble the fence pieces and use the pickets as planking to create a wainscoting. My plan was to nail the fence planks directly to the studs on the bottom half of the room to create a plank wainscoting and then drywall the ceiling and top half of the walls. So normally I would have put all the drywall up first and put the wainscoting on top... which gives me flexibility in the future if I want to change it so I would still have drywall underneath, however, this awkward space had just enough room for a Washer and Dryer to fit side by side with one layer of wall material against the studs. So I couldn't afford to put the planks on top of the drywall.

I'm not going to lie, I wasn't 100% sure how it would look when it was up, but I figured I could always take it down if I didn't like it and replace with drywall. My mindset when I am remodeling my own house or trying things out is that everything can always be undone or fixed so I might as well go for it. My fiancé does not share this mindset with me - hence, many arguments when we do house projects together!! Luckily for this project, I was the one and only making decisions so I just went for it!

Once I disassembled the fence sections, I picked through and found the pieces that were not totally falling apart. My plan was to cut off the tapered tops and any of the bottoms that looked rotted and too far gone; however, I didn't want to make any cuts yet so I could try to line up as many as I could to end on the wall studs to give me something to nail to for sturdiness.
Then I just started cutting different lengths and nailing away with trim nails. As you can see, not every single board ended on a stud because I did want to maintain the randomness of the boards as much as possible (similar to laying a hardwood floor) where boards didn't all start and stop in the same places. I did try to get as many possible into at least 2 studs. I used the cross-supports from the fence which were approximately 2"x3" to cap off the 1"x picket material to give it a slightly thicker top/ledge.


Once I put the 2"x3" cap on top, it was ready to hang the drywall! I just butted the drywall up to the top of the wainscoting. After the drywall was taped/mudded/sanded, I just ran a bead of paintable caulk on the seam between the drywall and the wainscoting cap that allowed me to paint when I painted the walls and covered any seam between the two.
The following weekend, I added a traditional white octagon dot tile for the flooring throughout the laundry room and powder room. Unfortunately the original hardwoods did not run all the way through that room and powder room so I had to take them out with demo. Tile was a better option for a laundry room anyways.
At a later time, I went back and put the original window and door trim that I very carefully removed during demo. Being a 100+ year old house, I wanted to keep all of the super thick solid wood trim throughout the entire home. Then I painted the walls a fun sage-y green color.
To complete the space, I added a tub sink in the corner. My mom had a leftover base cabinet from her kitchen remodel that I turned into a sink base with matching countertop and hardware to the kitchen. Since this cabinet was in the corner of the room that you could see from the kitchen, it was important that it tied in. I was absolutely in love with my one-of-a-kind laundry room! All for a super inexpensive price tag!! The wainscoting was free with a little blood, sweat, and tears! What an impact it made!


Let me know what you think about this super unique laundry room!! Next week my dream kitchen finally goes back together! Stay tuned and check out any previous parts you missed below!!
Check out Parts 1-7 of the Welcome to Shiawassee Street Blog Series:


Comments