
Kitchen Mini Reno - CUSTOM Countertops
- Katie
- Nov 8, 2022
- 6 min read

One Room Challenge - Week 7

I was keeping my fingers crossed that this week would be more than just countertops… but wow did these take longer than I thought they would (kinda like everything does). And sadly, I can’t even say they are done and installed yet! But I learned so much this past week from a woodworking perspective and these White Oak butcher block countertops are looking SOOOOO cool. Also, Jeremy so kindly gave me a gnarly cold so I have not been feeling super hot to really push through
Before we get any farther on Week 7, please make sure you have checked out Week’s 1-6 so you can see how far this kitchen (not-so-) mini reno has come since the beginning! Check them out here! Also, after you finish reading here, head over to the One Room Challenge Blog here to see all of the other projects going on!
So while I wish my kitchen had straightforward and standard countertops for this new butcher block… we very much do not. The coffee bar that I cut down last week was the only easy one that was one piece. Our island has a lower part and a bar height portion that is being extended to fit more barstools. The unfortunate part is that both sections are wider than the standard 25” (and they don’t work with the standard island sizes either). What this means is that I have to join 2 pieces together and make them look seamless.
I’m going to tell you, I am no way, shape, or form a woodworker. I really don’t know too much of what I’m doing. I have a little bit of experience as my ex and I made our own wood countertops out of 2x material about 8 years ago in our cottage. While I just did the sanding/staining portion, I did get to see how he joined the pieces of wood for reference. I also did quite a bit of research on how to join butcher block together as it is not an uncommon problem to tackle when putting butcher block in your kitchen.

So I had my gameplan in mind on how I wanted to tackle this. I’m going to go through this pretty briefly but will share a full tutorial soon so you can really see how I tackled this. But here is the basic idea:
- rip 2 pieces to half the desired size with a straight edge to fit tightly to the other one
- notch out for biscuits using biscuit cutter
- use pocket holes on bottom for added support
- use wood glue on straight edge and biscuits
- clamp to let dry
- sand smooth
The first thing to tackle was to rip the pieces down to size to allow me to put 2 together. Ideally, you would use a track saw. I do not have one nor did I want to fork over several hundred (or more) dollars for a new one for this particular project. So I tried to do this with my circular saw and a guide. And it wasn’t super great. It was definitely a wider gap than I wanted. Jeremy came out to “supervise” and of course said this wasn’t going to work. But luckily he has a friend somewhat nearby that is an amazing woodworker that said we could come over and he would help us.


We hauled all of the pieces over to Brian’s shop and I started drooling when I saw the shop. It was such a nice shop and had SO MANY amazing tools. Like tools that I only can dream of. He ran the two larger pieces on his table saw and wow did that make a difference. The smaller pieces were small enough that he also was able to run through the joiner after the table saw which has several individual blades that make that surface as flat as humanly possible. Holy Moly that thing is awesome! A perfect fit! I couldn’t have been more grateful for Brian and his wife giving up their evening so he could help me get these cut. They are seriously such great people!


Now that my pieces were cut I could tackle joining them together. I bought an inexpensive biscuit cutter from Harbor Freight. I really didn’t want to invest a lot because I honestly don’t know if I will ever use it again. And while it seemed to struggle a little bit with the really hard White Oak, it did the job.


I also finally invested in a Kreg pocket hole jig. This purchase was long overdue - I have been doing projects like this in Indiana mostly so I could use my dad’s. It was time I had my own. After cutting the slots for the biscuits, I drilled the pocket holes and then I was ready to put them together.


I dry fit my pieces first but once I knew they would fit, it was time to glue! I made sure I got ample glue in the slots for the biscuits and all over each edge. After sliding the pieces together by hand, I used my bar clamps to push them all the way together. While I had bought some inexpensive 48” clamps from Harbor Freight, luckily Brian let us borrow his super nice set of Bessey clamps. What a difference! I am so thankful we were able to use these much better clamps as they helped keep the surface as level as possible. I made sure to wipe up all of the glue so it didn’t drip all over the clamps and to reduce the sanding I would have to do later.


After letting the glue dry overnight, it was time to thoroughly sand the countertops. The idea is to take off a few small layers off of the top/bottom/sides. I started with an 80 grit to take off the most material. I moved up to 120 grit and then did a final sand with 180. One tip that Brian gave me was to right something in pencil on the surface of the wood and once it is totally gone, you know you have taken off enough material! I decided to have a little fun with it and wrote ORC Fall 2022 to sand off! I also had to make sure the seam was sanded smooth so you could not feel any difference in the two pieces.


The larger countertop was too big to manhandle on Brian’s joiner so it didn‘t have quite as tight of a joint as the smaller countertop did. It needed a little bit of wood filler. Instead of trying to find a wood filler at Home Depot that would match as closely as possible, I figured I could make my own wood filler that I was confident would match perfectly! A little bit of wood glue in the crack + the very fine dust from my orbital sander makes the perfect wood filler that is guaranteed to match the White Oak wood since it is made out of it’s own dust! You would never know there was a seam there once I got done!


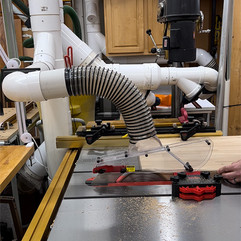
The last step to finish these countertops before sealing them is giving the edges a slightly eased edge. These particular countertops come with a very sharp edge which is not what I wanted in the kitchen. I used my router with a 1/8” roundover bit to give a slight rounded edge. Super smooth!


I’ll tell you what, this was a lot of work to get through this week. It was super time consuming and also back-breaking to lift these super heavy things. I have been icing my back nightly but these butcher block countertops did me in!

But… after putting the small one on the island to see how it looked with the navy cabinets, I am so in love! I am so excited to get the sealer on these and install them! What do you think? Stay tuned for the final week of the Challenge next week! Not sure I will get everything done, but I am going to keep pushing for more progress on this kitchen!
Happy designing + diy-ing!
Katie
Check out Weeks 1-6 of this Kitchen (not so) Mini Reno:


Comments